When designing your next email campaign, it is important to take the time to properly save and optimise your images for use inside email.
Images straight from your camera or print ready resolutions are not suitable for email marketing (or web!). Inside this workshop guide i will explain how you can quickly prepare those high resolution images ready for your email – without the need to use the services of a graphic designer or pay for expensive software.
Why Should i?
At this point you may be asking, why should i optimise my images for email? After all, your email may be loading perfectly fine as it is. Here is why you should always optimise your images for email:
> High resolution images from your camera or print ready are often up to 10mb in size. Lets say you have 5 images inside your email. This means that the poor recipient has to download a 50mb file just to view your email. The average global internet speed is only 2.9mbps. This means that your email would take several minutes to load. As a recipient, are you prepared to sit waiting for the email to load? or will you just hit the delete button? I know what i would do.
> Print ready images are normally at 300dpi. Your image will look great on a 50ft billboard in a city centre. Computer screens only render at 72dpi. This excess resolution is making your image bigger than it needs to be, thus slowing your email down!
> Most emails are 600px wide. Photo’s straight from your camera are on average 5000px wide. Fitting a huge image inside a small space will not only increase your spam score and slow down your email. Some email readers such as outlook 2010 are terrible at resizing images to fit into a small space, chances are when your email arrives inside outlook, the images will look distorted.
Hopefully by now i have convinced you that taking a few extra minutes to optimise your images for web is pretty important for the success of your email marketing. Lets find out how to quickly ready those images!
How to ready your images for email.
Method 1: Use Adobe Photoshop
If you have Adobe Photoshop installed on your computer, great! This program makes readying your images easy.
Step 1: Open your image inside Photoshop.
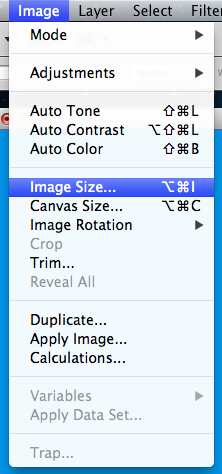
Step 2: From the main menu, select: Image > Image Size.
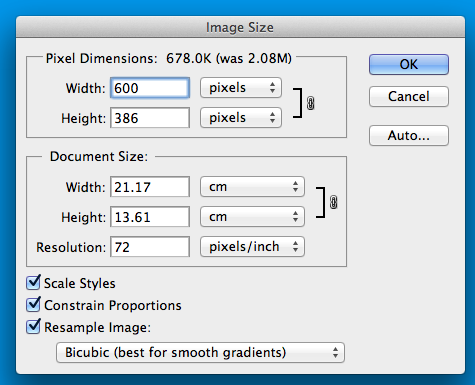
Step 3: A new window will now open showing your image size in Pixels. For email, your image should be no wider than 600px. If it is any wider, change the width to 600px and click ‘ok’.
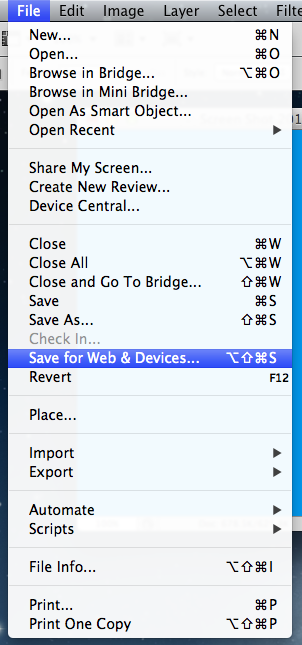
Step 4: Now we want to re-save your image ready for email and web. Photoshop has a save tool which will automatically optimise your image for email and web without loosing quality.
From the main menu select: File > Save For Web & Devices
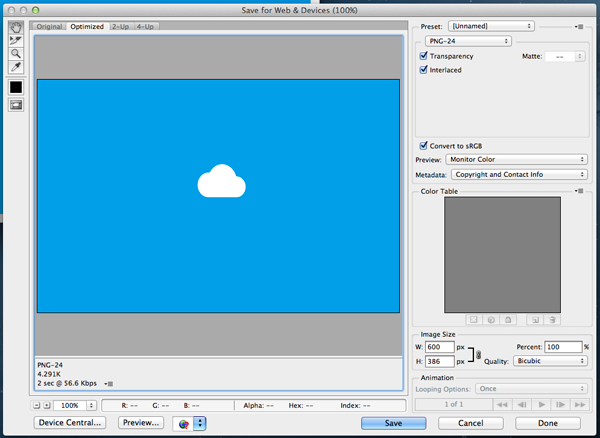
Step 5: The save window will now appear. For the file type we suggest using “PNG-24”. Click the save button, then you are done!
Method 2: Use Microsoft Paint
We don’t all have access to expensive graphics software such as Adobe Photoshop. If you are a windows user, don’t worry. Windows comes with its own pre-installed graphics program called “Paint”. While it does not offer all the advanced features that expensive graphics programs will, it can be used to save your images ready for use inside web and email.
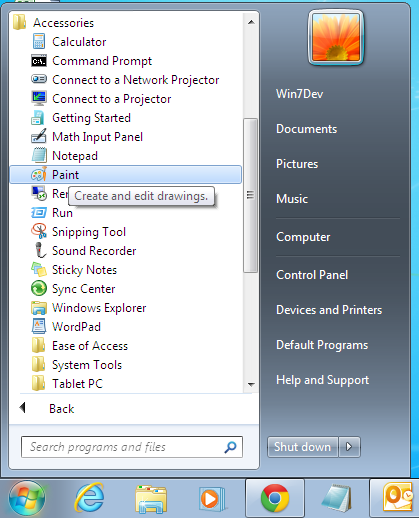
Step 1: Open your image inside Paint. If you have not used Paint before, from your desktop clicking: Start > All Programs > Accessories > Paint, to open the program.
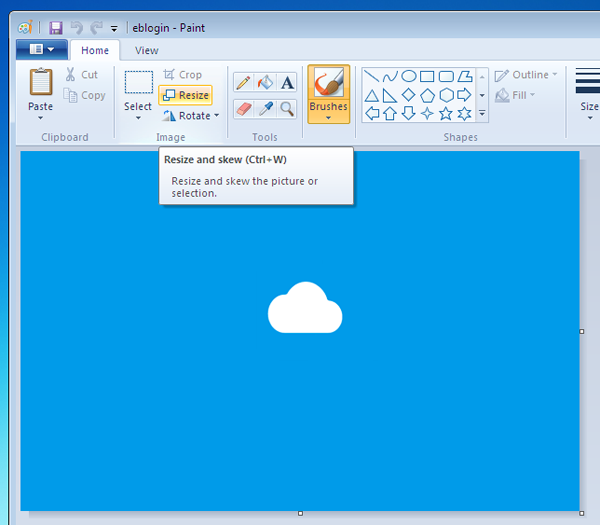
Step 2: Once your image has opened in Paint. From the menu at the top click on “Resize”.
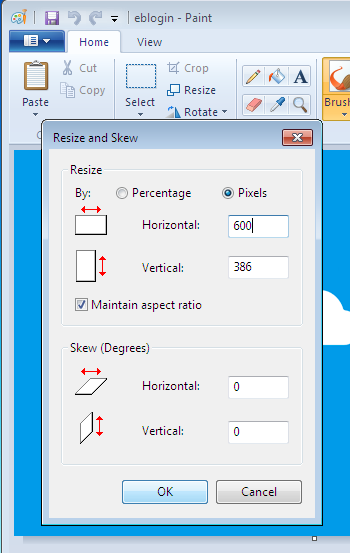
Step 3: A new window will now open. Inside the resize section, select “pixels”.
Step 4: Inside the “Horizontal” field, make sure your image is no wider than 600. If it is any wider, change the value to 600 and click ok.
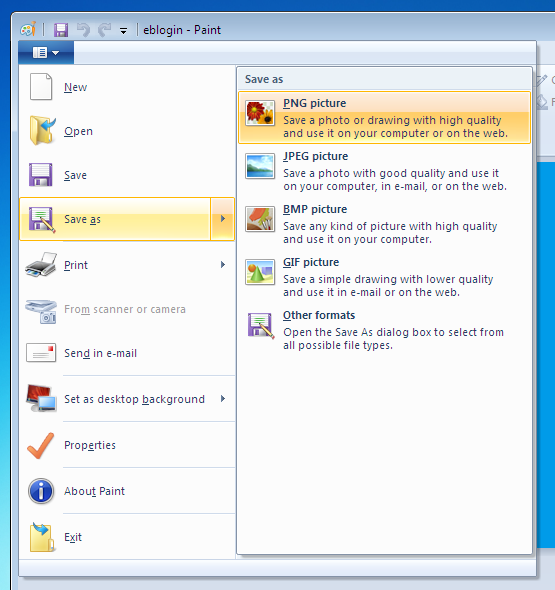
Step 5: Now we are ready to save your image. From the top of the screen, select: File > Save As > PNG Picture. Give your file a user friendly name, and hit save.
Your image is now ready for use inside web and email!
Method 3: Gimp Image Editor (free)
Gimp image editor is great. It has most of the features of Adobe Photoshop, but is free. This program works on PC, Mac & Linux. It’s open source, so wont cost you a penny to use. Head over to Gimp to pickup your copy. It is the most widely used image editor on Linux, and is safe to use.
Once you have Gimp installed and ready to use, open your image inside the editor.
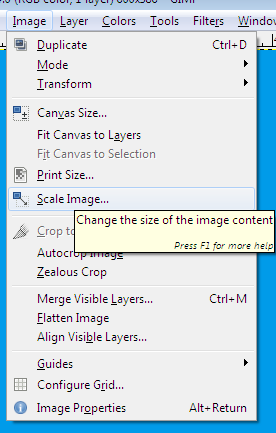
Step 1: From the main menu, select: Image > Scale Image.
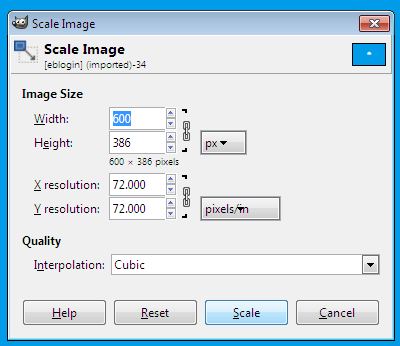
Step 2: Inside the width field, check that the value is no bigger than 600. If it is, change to 600 and select “scale”.
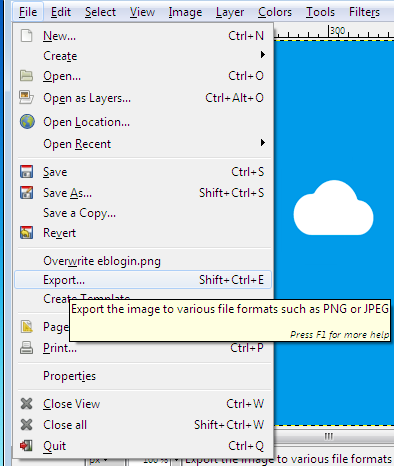
Step 3: We are now ready to save your image. From the main menu select: File > Export.
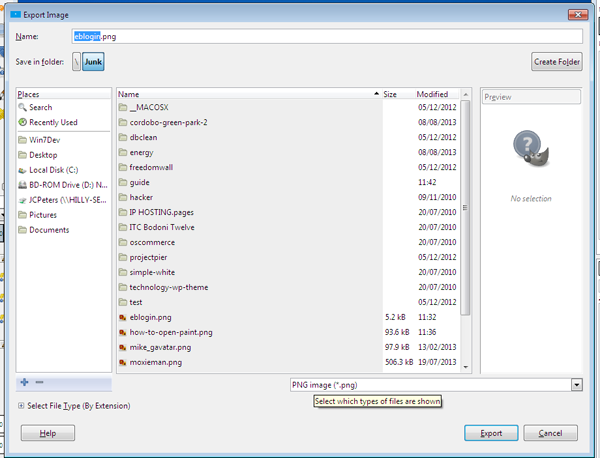
Step 4: A new window will now open. Bottom right of this window is a drop down menu allowing you to choose a file type, select ‘PNG Image’. Give your image a name, then select ‘Export’.
Your image is now ready for use inside web and email!
Summary
Awesome, hopefully by now you a fully aware of the need to and equipped with the tools to create happy emails with images which will load quickly and look great. Readying your images for email only takes a few minutes, but can have a large positive impact on the success of your email marketing – faster loading better looking emails.


