

Email service providers (such as Microsoft’s Outlook and Google’s Gmail) use SPF and DKIM authentication to help determine the legitimacy of your email newsletter and help prevent spoofing.
To help ensure that your email reaches your subscriber and does not get buried inside the spam folder, it is important to take a few moments to authenticate your domain name for use with email blaster.
Authentication can be done via adding a DKIM and SPF record to your company domain name. Both records sit behind the scenes, allowing email service providers to check the the authenticity of your newsletter.
Adding a SPF Record.
The first part of verification involves adding an SPF record to your domain name. The SPF record contains a list of the email gateways which you use at email blaster.
For your SPF record, on your companies DNS server, create a TXT record with the following value:
v=spf1 include:servers.ebsnd.com ?all
Your company domain name may already have an existing record (this is a very common way to verify email), if this is the case, you will need to add the email blaster record to your existing record. Standards dictate that your company domain name can only publish one record record, so merging both records is the required action.
If for example your current SPF record reads:
v=spf1 include:spf.protection.outlook.com ?all
Add the email blaster SPF record to your existing record as so:
v=spf1 include:spf.protection.outlook.com include:servers.ebsnd.com ?all
After publishing your SPF record, there are several public tools that you can use to check that everything was updated correctly. One of the most recommended is the Kitterman test.
Adding a DKIM Record.
DKIM authentication is a global standard designed to prevent email spoofing. It enables a subscriber (or their email service provider) to automatically check that your newsletter has actually originated by your company.
Email blaster uses the new 2048-bit key length for added security and is recommended by service providers such as Google.
The DKIM record sits behind the scenes on your company domain name, it is placed on your DNS server (like an SPF record).
On your organisation DNS server, create a CNAME record with the following values:
Name: eb._domainkey.yoursite.co.uk
Value: dkim.ebsnd.com.
Remember to replace yoursite.co.uk with your actual domain name!
This CNAME record forwards the verification check onto the email blaster network, which your subscribers email server will then be automatically provided with a secure key to verify the authenticity of your email.
After adding your DKIM record, you can quickly verify it by using the MX Toolbox DKIM lookup. On the MX toolbox page, enter your company domain name, followed by ‘eb’ as the selector:
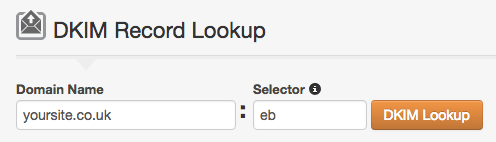
If successful the DKIM public key will be displayed in a green box.
Confirm verification inside email blaster.
After adding both your DKIM and SPF record, it is important to let your email blaster software know that you have done so – this will tell our systems to send your next newsletter with the relevant verification attached.
After adding your DNS record, allow up to 48 hours for the record to propagate (in most cases propagation takes only a few hours). After propagation, navigate to the sender profiles screen inside your email blaster, check that verification has been successful by clicking the refresh button on the verification screen next to your desired sender profile.
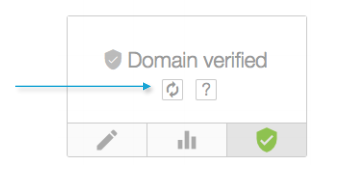
This will ask the email blaster servers to check that your domain has been verified correctly. Once successful, the green tick shield icon will appear next to your sender profile (as shown in the screen above).
Editing DNS records with common providers.
If you are a little stuck on adding the DNS records, we have provided below a few quick links to the most common domain providers:
GoDaddy – Add a CNAME Record (used for DKIM). Add a SPF Record
123-Reg – Add a CNAME Record (Used for DKIM). Add a SPF Record
Fasthosts – Add a CNAME Record (Used for DKIM). Add a SPF Record
Google Domains – Add a CNAME Record (Used for DKIM).
Hostgator – Managing DNS Records.
If your domain registrar is not listed above, head over to your provider and search their support site. Nearly all registrars will provide specific guides for editing your DNS server.
The team at email blaster will of course be happy to help, you can ask for further assistance by opening a support ticket from inside your software.

 use SPF and DKIM authentication for better delivery and inbox placement.)